ESP32単体で音を出力する(ESP8266Audio)
前にDFPlayerを使って音の再生をしました。しかし、この方法はでは、あらかじめ決められた固定のmp3・wavファイルの再生しかできないです。
- ネットからダウンロードしてmp3を再生する
- ネットから直接ストリーミング再生する
これをするにはESP8266Audioというライブラリを用いてESP32に再生させる必要があります。ESP8266AudioではI2Sを用いて外部のアンプモジュールで再生することを勧めています
Auto Amazon Links: プロダクトが見つかりません。
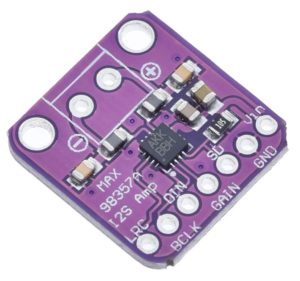
I2Sアンプモジュールでよく売っているのが上の商品です。意外に高めです(Aliでも500円ぐらい)。また、これを使わないでデータピンに直接スピーカーを接続する方法(ESPの内臓DAC利用)があります。両方やってみましたが、音質は圧倒的に外部アンプを用いたほうがノイズレスでクリアです。
|
1 2 3 4 5 6 7 8 9 10 11 12 13 14 15 16 17 18 19 20 21 |
#include "AudioOutputI2SNoDAC.h" #include "AudioOutputI2S.h" //AudioOutputI2SNoDAC *out; AudioOutputI2S *out; /* //内臓DACを利用する スピーカーをつなげるのはIO5 out = new AudioOutputI2SNoDAC(); out->SetPinout(26,25,5); // bclkPin = 26 wclkPin = 25 doutPin = 5 out->SetGain(3.999); // <4.0 out->SetRate(44100); out->SetBitsPerSample(16); out->SetChannels(1); */ //I2Sで外部アンプを利用 out = new AudioOutputI2S(); out->SetPinout(26,25,15); // bclkPin = 26 wclkPin = 25 doutPin = 15 out->SetGain(0.03); // <4.0 0.15Def out->SetRate(44100); out->SetBitsPerSample(16); out->SetChannels(1); |
あとでコードを全部載せますが出力するクラスは共通(AudioOutputI2SNoDACはAudioOutputI2Sのサブクラス)なので、出力の切り替えは上のコードにあるようにoutのインスタンスごと変えてしまえば、他はいじらなくていいです。便利です!!
AudioOutputI2SNoDACでやってみて本チャンでAudioOutputI2Sにするような感じでもいいですね。ただしGainの設定は注意です。外部アンプにSetGain(2.0)とか渡すとダイソーのスピーカーは壊れそうな爆音になります。ご注意を…
直でスピーカーを接続(AudioOutputI2SNoDAC)
上のブログを参考にして、2SC1815トランジスタをスピーカーに接続して再生してみました。音量が小さいのでsetGainで3.999を与えています。ちなみにコードを見ると有効設定値は4.0未満のようです。
上のブログでも指摘されていますが、230mA程度の電流が流れている(自分は計測してませんがw)ようです。
2SC1815の最大定格って150mAじゃなかったでした?
確かに再生し続けていると2SC1815がキンキンに熱くなります。常用は避けた方がよさそうです。でもESP8266Audio公式で勧めている2N3904もIc定格が200mAですので足りない気も…。自分で計測していないので深堀りはしません・・・
I2Sアンプを接続(AudioOutputI2S)
AudioOutputI2Sを初期化してSetPinout(26,25,15)を与えます。bclkPin = 26、wclkPin(LRC) = 25、doutPin(DIN) = 15、の通りにつなげます。あとはVin=3.3v、GNDを接続すればいいだけ。あーあと、「+」「-」にはスピーカーをつなげます。これだけで素晴らしい音が鳴ります。
ストリーミングの準備をする
素晴らしいことに、ESP8266Audioにはストリーミングを再生するサンプルがすでに用意されています。
|
1 2 3 4 5 6 7 8 9 10 11 12 13 14 15 16 17 18 19 20 21 22 23 24 25 26 27 28 29 30 31 32 33 34 35 36 37 38 39 40 41 42 43 44 45 46 47 48 49 50 51 52 53 54 55 56 57 58 59 60 61 62 63 64 65 66 67 68 69 70 71 72 73 74 75 76 77 78 79 80 81 82 83 84 85 86 87 88 89 90 91 92 93 94 95 96 97 98 99 100 101 102 103 104 105 106 107 108 109 110 111 112 113 114 115 116 117 118 119 120 121 122 123 124 |
#include <Arduino.h> #ifdef ESP32 #include <WiFi.h> #else #include <ESP8266WiFi.h> #endif #include "AudioFileSourceICYStream.h" #include "AudioFileSourceBuffer.h" #include "AudioGeneratorMP3.h" #include "AudioOutputI2S.h" //#include "AudioOutputI2SNoDAC.h" // To run, set your ESP8266 build to 160MHz, update the SSID info, and upload. // Enter your WiFi setup here: #ifndef STASSID #define STASSID "your-ssid" #define STAPSK "your-password" #endif const char* ssid = STASSID; const char* password = STAPSK; // Randomly picked URL const char *URL="http://kvbstreams.dyndns.org:8000/wkvi-am"; AudioGeneratorMP3 *mp3; AudioFileSourceICYStream *file; AudioFileSourceBuffer *buff; AudioOutputI2S *out; //AudioOutputI2SNoDAC *out; //内臓DAC用 // Called when a metadata event occurs (i.e. an ID3 tag, an ICY block, etc. void MDCallback(void *cbData, const char *type, bool isUnicode, const char *string) { const char *ptr = reinterpret_cast<const char *>(cbData); (void) isUnicode; // Punt this ball for now // Note that the type and string may be in PROGMEM, so copy them to RAM for printf char s1[32], s2[64]; strncpy_P(s1, type, sizeof(s1)); s1[sizeof(s1)-1]=0; strncpy_P(s2, string, sizeof(s2)); s2[sizeof(s2)-1]=0; Serial.printf("METADATA(%s) '%s' = '%s'\n", ptr, s1, s2); Serial.flush(); } // Called when there's a warning or error (like a buffer underflow or decode hiccup) void StatusCallback(void *cbData, int code, const char *string) { const char *ptr = reinterpret_cast<const char *>(cbData); // Note that the string may be in PROGMEM, so copy it to RAM for printf char s1[64]; strncpy_P(s1, string, sizeof(s1)); s1[sizeof(s1)-1]=0; Serial.printf("STATUS(%s) '%d' = '%s'\n", ptr, code, s1); Serial.flush(); } void setup() { Serial.begin(115200); delay(1000); Serial.println("Connecting to WiFi"); WiFi.disconnect(); WiFi.softAPdisconnect(true); WiFi.mode(WIFI_STA); WiFi.begin(ssid, password); // Try forever while (WiFi.status() != WL_CONNECTED) { Serial.println("...Connecting to WiFi"); delay(1000); } Serial.println("Connected"); audioLogger = &Serial; file = new AudioFileSourceICYStream(URL); file->RegisterMetadataCB(MDCallback, (void*)"ICY"); buff = new AudioFileSourceBuffer(file, 2048); buff->RegisterStatusCB(StatusCallback, (void*)"buffer"); /* //内臓DAC out = new AudioOutputI2SNoDAC(); out->SetPinout(26,25,5); // bclkPin = 26 wclkPin = 25 doutPin = 5 out->SetGain(3.999); // <4.0 out->SetRate(44100); out->SetBitsPerSample(16); out->SetChannels(1); */ out = new AudioOutputI2S(); out->SetPinout(26,25,15); // bclkPin = 26 wclkPin = 25 doutPin = 15 out->SetGain(0.05); // <4.0 0.15Def 音量注意 out->SetRate(44100); out->SetBitsPerSample(16); out->SetChannels(1); mp3 = new AudioGeneratorMP3(); mp3->RegisterStatusCB(StatusCallback, (void*)"mp3"); mp3->begin(buff, out); } void loop() { static int lastms = 0; if (mp3->isRunning()) { if (millis()-lastms > 1000) { lastms = millis(); Serial.printf("Running for %d ms...\n", lastms); Serial.flush(); } if (!mp3->loop()) mp3->stop(); } else { Serial.printf("MP3 done\n"); delay(1000); } } |
長いですが、書き換えたのはoutの部分の切り替えだけです。あとssidとpassを入れれば、英語のラジオが流れるはずです。
下の動画はDAC-I2Sを用いてストリーミングさせています。コードがごちゃごちゃしてますが、TFT液晶をつないでいるためです。必要なのはI2Sラインと電源・GNDだけです。
次の記事では実際にTTSで話させてみます。


