Pulse oximeter using MAX30102

I made a pulse oximeter using the MAX30102.
I found an article that graphs temperature, humidity and air pressure using Hightcharts and a BME280 sensor.
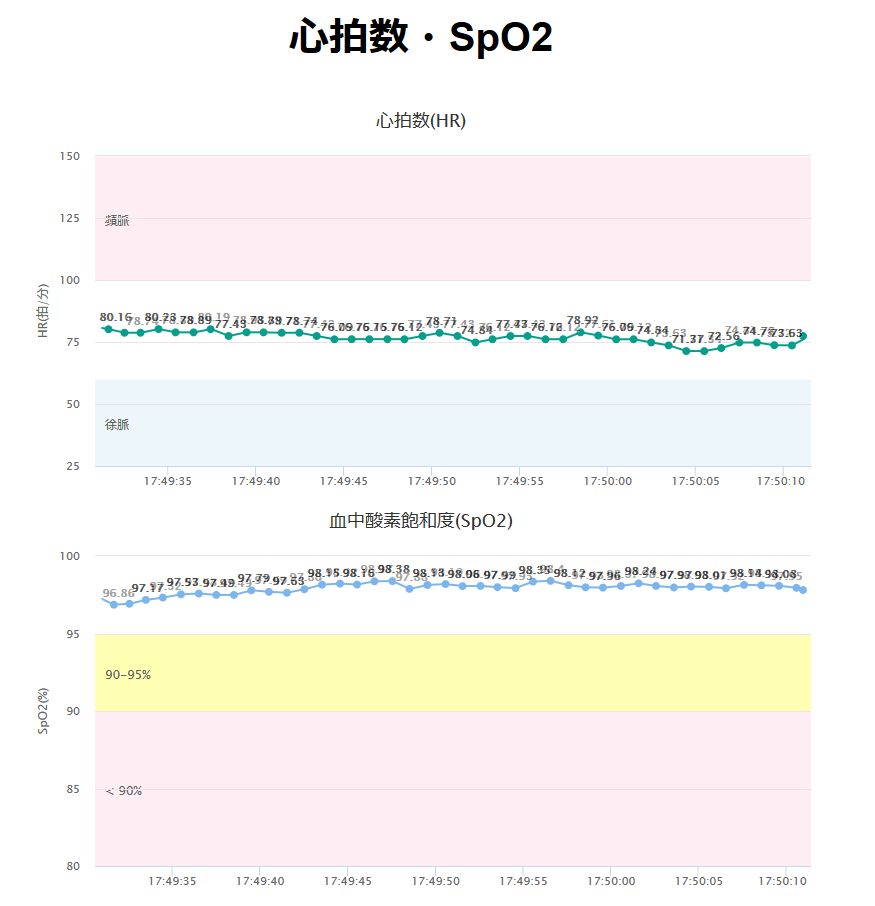
Then I found a video of their smartphone showing their heart rate and SPO2 in real time. Values are volatile.
Introduction of SPIFFS
I thought I would use the HighCharts library to display heart rate and SPO2 in real time. For that, I had to install the “SPIFFS file system uploader” in the ArduinoIDE. I’ll put the html file in SPIFF. That way, I can access the html and view the heart rate and SPO2 using HighCharts!
I consulted the site above.
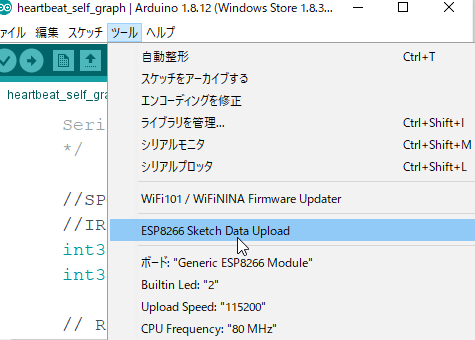
Finally, if “ESP8266 Sketch Data Upload” is added, it is OK.
Connection between MAX30102 and ESP8266
Same as my previous post. You may want to refer to it.

Contents of index.html
I used index.html from the article above as a reference. The following is the content of index.html
|
1 2 3 4 5 6 7 8 9 10 11 12 13 14 15 16 17 18 19 20 21 22 23 24 25 26 27 28 29 30 31 32 33 34 35 36 37 38 39 40 41 42 43 44 45 46 47 48 49 50 51 52 53 54 55 56 57 58 59 60 61 62 63 64 65 66 67 68 69 70 71 72 73 74 75 76 77 78 79 80 81 82 83 84 85 86 87 88 89 90 91 92 93 94 95 96 97 98 99 100 101 102 103 104 105 106 107 108 109 110 111 112 113 114 115 116 117 118 119 120 121 122 123 124 125 126 127 128 129 130 131 132 133 134 135 136 137 138 139 140 141 142 143 144 145 146 147 148 149 150 151 152 153 154 155 156 157 158 159 160 161 162 163 164 165 166 |
<!DOCTYPE HTML><html> <head> <meta name="viewport" content="width=device-width, initial-scale=1"> <script src="https://code.highcharts.com/highcharts.js"></script> <style> body { min-width: 310px; max-width: 800px; height: 400px; margin: 0 auto; } h2 { font-family: Arial; font-size: 2.5rem; text-align: center; } </style> </head> <body> <h2>心拍数・SpO2</h2> <div id="chart-hr" class="container"></div> <div id="chart-spo2" class="container"></div> </body> <script> // UTCを使わずにJSTを使う Highcharts.setOptions({ global: { useUTC: false } }); var chartHR = new Highcharts.Chart({ chart:{ renderTo : 'chart-hr' }, title: { text: '心拍数(HR)' }, series: [{ showInLegend: false, data: [] }], plotOptions: { line: { animation: false, dataLabels: { enabled: true } }, series: { color: '#059e8a' } }, xAxis: { type: 'datetime', dateTimeLabelFormats: { second: '%H:%M:%S' } }, yAxis: { title: { text: 'HR(拍/分)' }, min : 30, max : 150, plotBands: [{ // 徐脈 from: 0, to: 60, color: 'rgba(68, 170, 213, 0.1)', label: { text: '徐脈', style: { color: '#606060' } } },{ // 頻脈 from: 100, to: 200, color: 'rgba(250, 75, 130, 0.1)', label: { text: '頻脈', style: { color: '#606060' } } } ] }, credits: { enabled: false } }); setInterval(function ( ) { var xhttp = new XMLHttpRequest(); xhttp.onreadystatechange = function() { if (this.readyState == 4 && this.status == 200) { var x = (new Date()).getTime(), y = parseFloat(this.responseText); //console.log(this.responseText); if(chartHR.series[0].data.length > 40) { chartHR.series[0].addPoint([x, y], true, true, true); } else { chartHR.series[0].addPoint([x, y], true, false, true); } } }; xhttp.open("GET", "/hr", true); xhttp.send(); }, 1000 ) ; var chartSPO2 = new Highcharts.Chart({ chart:{ renderTo:'chart-spo2' }, title: { text: '血中酸素飽和度(SpO2)' }, series: [{ showInLegend: false, data: [] }], plotOptions: { line: { animation: false, dataLabels: { enabled: true } } }, xAxis: { type: 'datetime', dateTimeLabelFormats: { second: '%H:%M:%S' } }, yAxis: { title: { text: 'SpO2(%)' }, min : 80, max : 100, plotBands: [{ // 90-95% from: 90, to: 95, color: 'rgba(255, 255, 65, 0.4)', label: { text: '90-95%', style: { color: '#606060' } } },{ // 90以下 from: 0, to: 90, color: 'rgba(250, 75, 130, 0.1)', label: { text: '< 90%', style: { color: '#606060' } } } ] }, credits: { enabled: false } }); setInterval(function ( ) { var xhttp = new XMLHttpRequest(); xhttp.onreadystatechange = function() { if (this.readyState == 4 && this.status == 200) { var x = (new Date()).getTime(), y = parseFloat(this.responseText); //console.log(this.responseText); if(chartSPO2.series[0].data.length > 40) { chartSPO2.series[0].addPoint([x, y], true, true, true); } else { chartSPO2.series[0].addPoint([x, y], true, false, true); } } }; xhttp.open("GET", "/spo2", true); xhttp.send(); }, 1000 ) ; </script> </html> |
Heart rate and SPO2 were set as the graphs to be displayed. The minimum and maximum values of the X and Y axes were changed. The data update interval was changed to every 1 second.
Contents of the sketch
I created a server with ESP8266. I have also enhanced the heart rate and SPO2 noise processing. So, The code in my previous article is more readable.
|
1 2 3 4 5 6 7 8 9 10 11 12 13 14 15 16 17 18 19 20 21 22 23 24 25 26 27 28 29 30 31 32 33 34 35 36 37 38 39 40 41 42 43 44 45 46 47 48 49 50 51 52 53 54 55 56 57 58 59 60 61 62 63 64 65 66 67 68 69 70 71 72 73 74 75 76 77 78 79 80 81 82 83 84 85 86 87 88 89 90 91 92 93 94 95 96 97 98 99 100 101 102 103 104 105 106 107 108 109 110 111 112 113 114 115 116 117 118 119 120 121 122 123 124 125 126 127 128 129 130 131 132 133 134 135 136 137 138 139 140 141 142 143 144 145 146 147 148 149 150 151 152 153 154 155 156 157 158 159 160 161 162 163 164 165 166 167 168 169 170 171 172 173 174 175 176 177 178 179 180 181 182 183 184 185 186 187 188 189 190 191 192 193 194 195 196 197 198 199 200 201 202 203 204 205 206 207 208 209 210 211 212 213 214 215 216 217 218 219 220 221 222 223 224 225 226 227 228 229 230 231 232 233 234 235 236 237 238 239 240 241 242 243 244 245 246 247 248 249 250 251 252 253 254 255 256 257 258 259 |
#ifdef ESP32 #include <WiFi.h> #include <ESPAsyncWebServer.h> #include <SPIFFS.h> #else #include <Arduino.h> #include <ESP8266WiFi.h> #include <Hash.h> #include <ESPAsyncTCP.h> #include <ESPAsyncWebServer.h> #include <FS.h> #endif #include <Wire.h> #include "MAX30105.h" #include <movingAvg.h> MAX30105 particleSensor; //------ Wifi AP情報 const char* ssid = "<SSID>"; const char* password = "<パスワード>"; //------ 定数定義 const uint32_t TH_FIN = 7000; //指が置いてあるかどうかの閾値 const int32_t TH_AMOUNT = 250; //パルスの起点となる検出変化量 const int32_t MIN_INIT = 9999999; //最小値の初期値 const int32_t MAX_INIT = 0; //最大値の初期値 //表示する心拍数とSpO2の範囲(用途により適宜変更) const uint32_t DISP_MIN_HR = 30; const uint32_t DISP_MAX_HR = 200; const uint32_t DISP_MIN_SPO2 = 70; const uint32_t DISP_MAX_SPO2 = 100; //瞬間心拍数の許容範囲(デフォルトは表示範囲と一緒) const uint32_t MAX_MOMENT_HR = DISP_MAX_HR; const uint32_t MIN_MOMENT_HR = DISP_MIN_HR; //ノイズと判断するカットレート 0.3 移動平均の+-30%の変化を認める // ex ) 移動平均70拍 : 49~91の範囲外はカットオフする const double NOISE_CUTOFF_RATE = 0.3; //HRの移動平均データのリセットするカットオフの連続回数 const uint32_t MAX_CUTOFF_COUNT = 5; //パルス検出保持変数 long l_time = millis(); //最後のパルス検出時間の保持 int32_t before_ir_v = 0; //最後のir_v値保持 int32_t b_diff = 0; // 最後の差の保持 long pulse_interval = -1; // パルス間隔時間 //1パルス中の生データの最大・最小値の保持 int32_t min_ir_v = MIN_INIT ,max_ir_v = MAX_INIT; int32_t min_red_v= MIN_INIT ,max_red_v = MAX_INIT; //生データの変化値の保持 int32_t diff = 0; //移動平均値(IR_DC、RED_DC) デフォルトは30(大体20~50の範囲で指定)サンプル movingAvg avgIr_v(30); movingAvg avgRed_v(30); //移動平均値(心拍数は直近3ビート、SPO2は5ビートの平均) movingAvg avgHR(3); movingAvg avgSPO2(5); //連続カットオフ回数 //MAX_CUTOFF_COUNT回連続でカットオフされたらavg_HRをリセットする int32_t cutoff_c = 0; //グラフ描記用のサーバー AsyncWebServer server(80); void setup() { Wire.begin(0,2); // I2Cのピン設定 Serial.begin(115200); Serial.println(""); Serial.println("Initializing..."); // センサー初期化 while(!particleSensor.begin(Wire, I2C_SPEED_FAST)){ Serial.print("."); } Serial.println("OK!"); byte ledBrightness = 0x1F; //Options: 0=Off to 255=50mA byte diffmpleAverage = 8; //Options: 1, 2, 4, 8, 16, 32 byte ledMode = 2; //Options: 1 = Red only, 2 = Red + IR, 3 = Red + IR + Green int diffmpleRate = 400; //Options: 50, 100, 200, 400, 800, 1000, 1600, 3200 int pulse_intervalWidth = 411; //Options: 69, 118, 215, 411 int adcRange = 4096; //Options: 2048, 4096, 8192, 16384 particleSensor.setup(ledBrightness, diffmpleAverage, ledMode, diffmpleRate, pulse_intervalWidth, adcRange); //Configure sensor with these settings //初期値として一回読んでおく(ir_vをパルス計測に用いる) before_ir_v = particleSensor.getRed(); //パルス最終取得時間の初期化 l_time = millis(); //移動平均ライブラリの初期化 avgIr_v.begin(); avgRed_v.begin(); avgHR.begin(); avgSPO2.begin(); // Initialize SPIFFS if(!SPIFFS.begin()){ Serial.println("An Error has occurred while mounting SPIFFS"); return; } // Connect to Wi-Fi WiFi.begin(ssid, password); while (WiFi.status() != WL_CONNECTED) { delay(1000); Serial.println("Connecting to WiFi.."); } // IPアドレス http://XXX.XXX.XXX.XXX/index.html にアクセス Serial.println(WiFi.localIP()); // グラフ描記のルート index.html server.on("/", HTTP_GET, [](AsyncWebServerRequest *request){ request->send(SPIFFS, "/index.html"); }); //心拍数 server.on("/hr", HTTP_GET, [](AsyncWebServerRequest *request){ char hr_st[10]; if(avgHR.getCount()>0){ dtostrf((double)avgHR.getAvg() / 1000.0, 0, 2,hr_st); }else{ sprintf(hr_st,"0.00"); } request->send_P(200, "text/plain", hr_st); }); //SPO2 server.on("/spo2", HTTP_GET, [](AsyncWebServerRequest *request){ char spo2_st[10]; if(avgSPO2.getCount()>0){ dtostrf((double)avgSPO2.getAvg() / 1000.0, 0, 2,spo2_st); }else{ sprintf(spo2_st,"0.00"); } request->send_P(200, "text/plain", spo2_st); }); //簡易ECG 高速で読みだせばEGCグラフも描記できるかも ※未実装 server.on("/ecg", HTTP_GET, [](AsyncWebServerRequest *request){ char ecg_st[10]; sprintf(ecg_st,"%d",diff); request->send_P(200, "text/plain", ecg_st); }); // Start server server.begin(); } void loop( { //逆になっている。センサーが逆を返しているので各自チェック uint32_t red_v = particleSensor.getIR(); uint32_t ir_v = particleSensor.getRed(); //指を置いているか if(red_v< TH_FIN || ir_v < TH_FIN) return; //移動平均値(IR_DC RED_DCの算出) double ir_v_dc = avgIr_v.reading(ir_v); double red_v_dc = avgRed_v.reading(red_v); //IRとREDのACを求める為に最大値・最初値の更新 if(ir_v<min_ir_v) min_ir_v = ir_v; if(ir_v>max_ir_v) max_ir_v = ir_v; if(red_v<min_red_v) min_red_v = red_v; if(red_v>max_red_v) max_red_v = red_v; //パルス検出にはir_vを利用。前回との差分(変化値)を求める diff = before_ir_v - ir_v; //TH_AMOUNT以上の変化がある場合、パルス起点と推定 if(b_diff < TH_AMOUNT && diff > TH_AMOUNT){ //1パルスの時間を計算 pulse_interval = millis() - l_time; l_time = millis(); //推定されるパルスの瞬間心拍数の計算 double hr_r = 60000.0/pulse_interval; boolean f; if(avgHR.getCount()>=3){ //移動平均avgHRでhr_rの妥当性を判断(+-NOISE_CUTOFF_RATEの範囲内にあるか) double hr_avg = (double)avgHR.getAvg() / 1000.0; f = hr_r > hr_avg*(1.0-NOISE_CUTOFF_RATE) && hr_r < hr_avg*(1.0+NOISE_CUTOFF_RATE); }else{ //移動平均がない場合はしゅんかん定義の心拍数の範囲内かどうか f = hr_r >= (double)MIN_MOMENT_HR && hr_r <= (double)MAX_MOMENT_HR; } if(f){ //連続カットオフカウントのリセット cutoff_c = 0; //1パルスの時間より心拍数の計算。avgHRは整数のみなので1000倍して1000で割り小数保持 double hr = (double)avgHR.reading(hr_r * 1000.0 ) / 1000.0; //SPO2の計算 //IR・REDのACを求める(振幅最大-振幅最小) int32_t ir_v_ac = max_ir_v-min_ir_v; int32_t red_v_ac = max_red_v-min_red_v; // R = (AC_RED / DC_RED) / (AC_IR / DC_IR)の計算式より double red_div = double(red_v_ac)/red_v_dc; double ir_div = double(ir_v_ac)/ir_v_dc; double R = red_div / ir_div; // SPO2 = -45.060*R^2 + 30.354*R + 94.845 これはspo2_algorithm.cppにあったのを準用 // 乗除1000は小数保持のため double spo2 = (double)avgSPO2.reading((-45.060*R*R + 30.354*R + 94.845)*1000.0) / 1000.0; //最大値・最小値の初期化 min_ir_v = MIN_INIT; max_ir_v = MAX_INIT; min_red_v = MIN_INIT; max_red_v = MAX_INIT; //心拍数とSPO2の表示(範囲は定義で変更可) if(hr <= DISP_MAX_HR && hr >= DISP_MIN_HR && spo2 <= DISP_MAX_SPO2 && spo2 >= DISP_MIN_SPO2){ Serial.print(hr); Serial.print(","); Serial.println(spo2); } }else{ //瞬間心拍範囲外・カットオフ cutoff_c++; if(cutoff_c >= MAX_CUTOFF_COUNT){ avgHR.reset(); //Serial.println("avgHR reset"); } } } //パルス検出用値の保持 before_ir_v = ir_v; b_diff = diff; } |
Result
You should take a look at my Youtube videos for reference. The values are consistent with a typical pulse oximeter.
Thanks for your reading.